Archive for Maret 2014
A Guide to Making Better Photos With Natural Light
Photography depends on the available light, and natural light is the more common form of light photographers use. Learn to get the most out of natural light by understanding it.

It does not matter how sophisticated or simple photographer's cameras are, they all depend on the same light. Understanding how to use light, in this case natural light, can make a photographer with a simple compact camera achieve better results than one with a professional DSLR.
Photographer's often use the term "natural light" to describe any light that's a part of the environment like the sun, street lights or even a fire. In this tutorial, we're going to narrow the definition to light that comes from the sun.
Even with this definition, it's also important to understand that natural light comes in different forms, producing a variety of results.Many times light is the reason a photographer will create a picture. Sometimes it's the light, and what it creates, that is the theme of the photograph.
The Big Light in the Sky
The sun is the source of all natural light. Although it is just a big, continuous light up in the sky, the way the sun behaves is not always the same. Its light changes during the day, due to weather conditions and also its position in the sky.
In general terms, there are three types of light: direct, diffused and reflected. Usually, all things we photograph are influenced by these three types of light, in different quantities according to the hour of the day, cloud coverage and the surroundings of the subject we photograph.

Understanding Different Types of Light
To take better photographs, it is important to understand exactly what light does to the subject. So, direct sunlight creates warmer tones, but also introduces more contrast, while diffused light (when a cloud layer creates like a studio softbox effect) lowers contrast and creates a cooler look to the photograph.
The third type of light is reflected light, when the sun's rays bounce from a surface near the subject. This type of light transmits the qualities of the object it reflects from, so if you place your subject close to, for example, a red wall, there will be a dominant red tone introduced in the final image.
Light Changes with Time
Although your natural light source is always the same, it also changes depending on the time of day. That's the reason why photographers are told to go out early in the morning and late afternoon. Sunrise and sunset times are the best times to take photos, especially of landscapes, but it is also a good time for almost all other types of photography.
At sunrise and sunset expect moderate contrast, less than at noon or the rest of the day, when the sun is high in the sky. During early morning or late afternoon the sun rays travel more horizontally and have to pass through more layers of the atmosphere, resulting in a warmer light and also rapid changes in tonality, something landscape photographers like to explore in their images. At this hour the shadows are longer, contributing to create more patterns and define volume on subjects, be it a mountain range or the shoreline.
Light Changes with the Weather

The light changes according to the weather. Besides time of day, this is the second most important natural light modifier you will find in photography. A layer of clouds moving in the sky softens the light when it passes under the sun. The thicker the layer of clouds, the less visible shadows become.
The soft light created when the sky is covered with clouds is ideal for flower photography, for example, and for portraits. The light may seem dull, but in fact opens interesting possibilities, for example in the realm of wildlife. I prefer to shoot wild animals with overcast light, because then I do not have to worry about losing detail in deep shadows. It also seems to work better, with many animals, to enhance the mood of their habitats.
Extreme changes in weather, common in winter, can also offer you great experiences in terms of light, and this at any hour of the day. Pictures like the one opening this article, taken on the Portuguese coastline, are a good example of the fantastic light and definition after a storm with rain.
The dark cloudy sky opened to let the late afternoon sun shine over the village perched on the cliffs. Being there, patiently waiting to see things change is part of the lesson of understanding light.
Shooting at Noon

The light during the middle of the day is hard. Photographers tend to use those hours to do other things. Though this is generally a good rule to follow, try to break it sometimes and you might be surprised. The midday light is not necessarily bad, but it is different. Not the most flattering for portraits, as it creates shadows under the eyes (raccoon eyes, we say), nose and chin, but there are lots of other subjects you can shoot.
Landscapes, especially those bright saturated beachscapes without clouds in the sky, with transparent sea waters you see in travel brochures are often shot during midday. It is also at this time of day that polarizers can be put to good use, both to manage contrast and to saturate colours, although it is absolutely necessary to make sure that colours do not look garish while the skies become excessively dark and blue.
The Old Front Lighting Rule
The first rule many people learn when starting photography is to keep the sun on their back. It is the easiest way, in general terms, to have a good exposure, but it is not the most interesting light if you want to give a three dimensional effect to your photographs. There are times when this type of light will work, but you will soon start to look for other ways to create your photographs. It's time for adventure!
Side Lighting and Backlighting

When you place your subject so the light comes from an angle to one of its sides, things start to get interesting, but also trickier to control. Your images will reveal more texture and volume, but also harsh shadows and contrast. At this moment, you can introduce a reflector on the shadowed side, to bounce light back into the subject and so reduce the difference between the areas of light and shadow.
Backlighting is also something to explore, and in this type of situation you can also try to use a reflector to direct some of the light to the frontside of the subject, but nothing stops you from exposing for the subject and simply let the background go overexposed. This technique works well with portraiture, or with flowers, an area where I use it quite a lot.
Sunrise and Sunset

For me, these are the preferred periods to photograph. When a cloud layer covers the sky, the rising or setting sun rays will bounce on it and create a unique atmosphere, with a soft warm light that explains the term "golden hour" photographers use to refer to these short periods of the day.
Blue Hour Magic

The end of the sunset should not signal the end of your time shooting. Those that stay behind will have another chance for unique photographs. The "blue hour" lasts for only some minutes, but it can be enough for you to get a moody picture that really contrasts with the images taken under the late afternoon sun. For photographers not afraid to get up early there is also a blue hour on the other side of the day, before the sun rises.
Good Light is All Around You
Exploring all the situations mentioned here will not only provide you with some photographs that may surprise you and your friends, but also give you a broader understand of light. I hope this prepares you to explore even further, when natural light begins to be so scarce that you need a tripod, exposures of seconds or minutes, and lots of patience. Most importantly, remember that light isn't something to be scared of. Embrace it as it comes.
resource : https://photography.tutsplus.com/tutorials/
Simple Steps for Shooting Amazing Silhouettes
Simple Steps for Shooting Amazing Silhouettes
Silhouettes can be an excellent way to add drama to a scene. The stark contrast and lack of detail in the subject infuse a psychological effect into the image that can be beautiful, mysterious, or even frightening.
Today we'll look at a few suggestions to keep in mind the next time you set out to shoot some silhouettes. We'll also examine the settings used in some real-life amazing silhouette shots to see what we can learn from them.
Choose Your Subject Carefully

(source)
Before you consider the technical details and camera settings, you need to put some thought into your subject. It's a tricky situation that will involve a bit of experimentation to get just right. You'll want your subject to be relatively simple and very pronounced in shape on a two-dimensional level. The nature of a silhouette shot means that you'll stripping any detail and nearly all perception of depth from the subject.
Be wary of subjects that are overly blocky and/or obstructive such as boring buildings or simple sculptures. Also be careful about including multiple people in the shot. If there is too much overlap, the resulting silhouette will be confusing and indistinct. Make sure each subject is clearly identifiable as an independent object.

(source)
One shot you see often is a "kissing silhouette" where two people are embracing and kissing but their faces overlap so much the resulting image is a little strange to look at.

(source)
As you can see in the photograph above, even though it's a great image, if you concentrate on the facial overlap of the silhouette, it's a little unsettling. If you try to mimic this shot, try to shoot the subjects when their faces are further apart, either right before or after the point of touching. Remember that these same principles apply to any two objects that will be overlapping in your composition, not just people.
Lighting

(source)
Obviously, silhouettes are all about backlighting. The basic idea is that the background will be so bright that it overpowers the foreground and the side of the subject facing you. This is where you have to learn to think and see like a camera.
If you've ever unintentionally shot a silhouette you know that what the camera sees is often not what you see at all. Sometimes you can see your subject just fine despite the bright backlight, but the resulting shot is a silhouette because of the differences in the way your camera and your eyes gather light.
We'll discuss this more when we get into settings, for now let's look at the two primary types of lighting scenarios for silhouette shots.
Lighting Part 1: In the Studio

(source)
Silhouette shots in the studio are the easiest to control as long as you've got the right equipment. Usually, you want to engineer your background to be fairly solid and simple to maximize the contrast of the silhouette. So grab a light colored, solid backdrop and hit it with your studio lights. Place these behind your subject but out of the frame.
If you want to control the tone and impression of the image beyond the shape of the subject, try infusing bright colors and experimenting with vignettes.

(source)
Another variable to experiment with is how much of the subject you want to be silhouetted. Partial silhouettes that allow selective areas of detail can make for some amazing shots.
Lighting Part 2: In the Wild

(source)
Silhouette shots in uncontrolled environments can be a lot more unpredictable, which can be good or bad depending on how well you can adjust to to rapidly changing lighting conditions. Sunlight can be tricky to use effectively to use for most of the day. This is why 90% or more of the outdoor silhouette shots you'll see are taken around sunrise or sunset. Naturally, since the sun is lowest in the sky at these points and is obscured by the most atmospheric interference, it makes an ideal and often colorful backlight.
However, as indicated above, this can be a lot more stressful than shooting in a studio environment because as the sun's position on the horizon changes, your lighting conditions will quickly be affected. If you're shooting in full manual you really have to keep an eye on the results and continually make adjustments. Make sure you are very familiar with your cameras settings - ideally you'll be able to make incremental changes without losing time by taking your eye out of the viewfinder. Unfortunately, your window of opportunity with the perfect lighting conditions is often quite small.

(source)
If you're shooting with the sun as your backlight, there are lots of variables to consider in the composition: clouds, buildings, elevation of the subject in relation to the camera, position of the sun relative to the subject, etc. Experiment with every one of these variables to see what produces the effect and mood you're going for. The photographer of the beautiful image above used an intentional lens flare as the central point of the image while positioning the subject to the rightmost third of the shot.
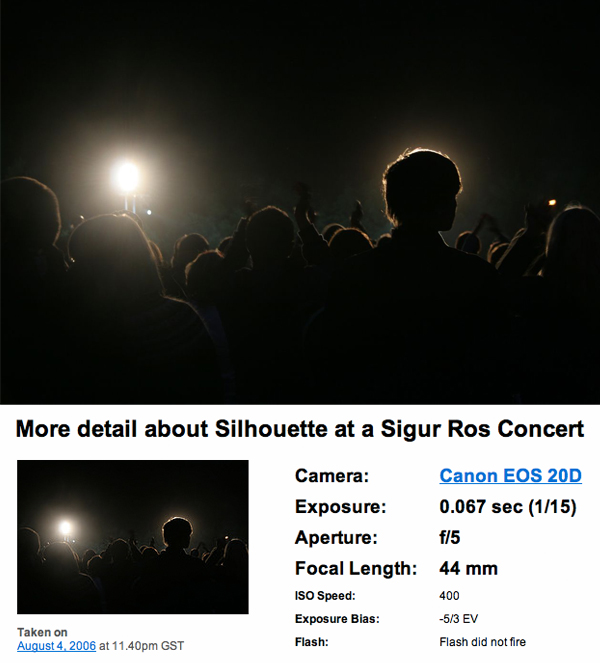
Camera Settings
To get a feeling for how to set your camera to shoot good silhouettes, we'll utilize the "more properties" feature on Flickr to see how some actual photos were taken. Looking at what has actually worked for other photographers is an excellent way to learn how to take similar pictures yourself so make it a point to use this feature frequently!
Silhouette Shooter

(source)
The image above shows that sometimes a complex background can work out really well under the right circumstances. It's not immediately apparent exactly what the light source in this image is. It might be a window or simply a colorful piece of glass outside of a well lit room.
As you can see, the exposure was set to 1/200 sec, the aperture to f/2.2 and the ISO to 1600. These three factors are very important pieces of the puzzle and have an immense impact on the final image. The shutter speed (1/200) is set fairly fast for a dark room. If you were trying to capture more detail, this would probably have to be closer to 1/100 or slower (making it more difficult to get a crisp image with a handheld) but since blocking out detail is exactly what you're going for, it works out well that you can shoot at a faster shutter speed. This benefit can allow you to capture motion silhouettes without worrying too much about blur.
The aperture at f/2.2 is actually letting in a lot of light despite the resulting dark image. Remember that when we're talking aperture, the higher the number, the darker the image due to the reduced amount of light being let in. Many lenses won't even reach as low as 2.2 - this, combined with the fact that the photographer was shooting with a Canon 5D, tells us that his equipment budget is fairly considerable. So don't be discouraged if your results aren't quite as good!
Lenses that let you shoot this low are perfect for low-light scenarios, whether shooting silhouettes or not. Just beware that as the aperture goes down, the depth of field will become shallower. The shallower your depth of field becomes, the more difficult it will be to get a crisp silhouette as only a very small portion of the image will be in focus.
Finally, the ISO was set to 1600. Remember that as the ISO increases, your image will get brighter but will suffer the unfortunate side effect of increased color noise. Again, this photographer shot with a 5D so color noise will be much less of a problem at 1600 than it would be for a cheaper camera such as a Canon Rebel. The relatively low amount of ambient light in the scene probably forced the photographer to shoot up at 1600. Outdoor silhouettes often benefit from the large amount of available light and can therefore be shot at closer to 100-200 if there is enough sun.
Luis and the Balloons

(source)
Though visually very different, this image is conceptually very similar to the last. We again see a lone figure in front of a colorful light source shot at a fairly high zoom level (coincidentally, it's the same photographer). This time the exposure is even faster, 1/250, allowing for even less light to enter in. The aperture is also set to allow less light in at 3.2 (still quite low by most standards). The low depth of field works really well for the shot here as it blurs out some of the balloons that are further away, enhancing the aesthetic of the shot.
Lastly, the photographer stayed true to his last shot and stuck with an ISO of 1600. Click on the largest version of the file to see the resulting color noise on some of the balloons. Again, this is not desirable but is often unavoidable when shooting in the dark.
More Examples
Now that we've gone through how to break down and interpret the settings, here are a few more examples for you to consider on your own.

(source)
(source)

(source)
(source)
Your Turn
Now that you've read our ideas about how to capture great silhouettes, tell us yours! Be sure to share any links you have to great silhouette shots you've taken.


